上篇文章我们说了怎么使用Rclone和Alist配合扩容我们服务器的操作,其实单用Rclone就可以直接挂载很多云盘的,不过有些麻烦而已,不如Alist客户端的更直观,这节呢我们就说说怎么直接用Rclone挂载微软的OneDrive,为什么要用OneDrive呢,因为Onedrive的开发者账号,单账号就有5T的空间,还是非常可观的。
创建 OneDrive API
1.1 获取 client_id
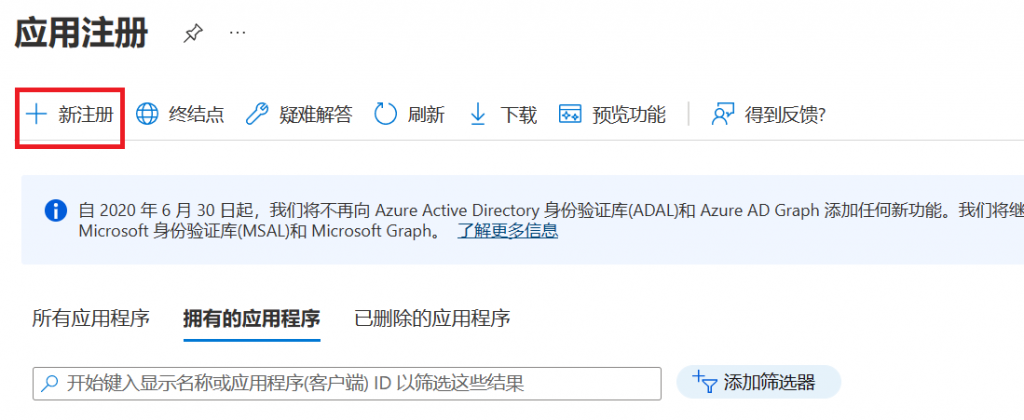
首先访问 Microsoft Azure 应用注册,登录账号后点击应用注册
点击左上角的新注册
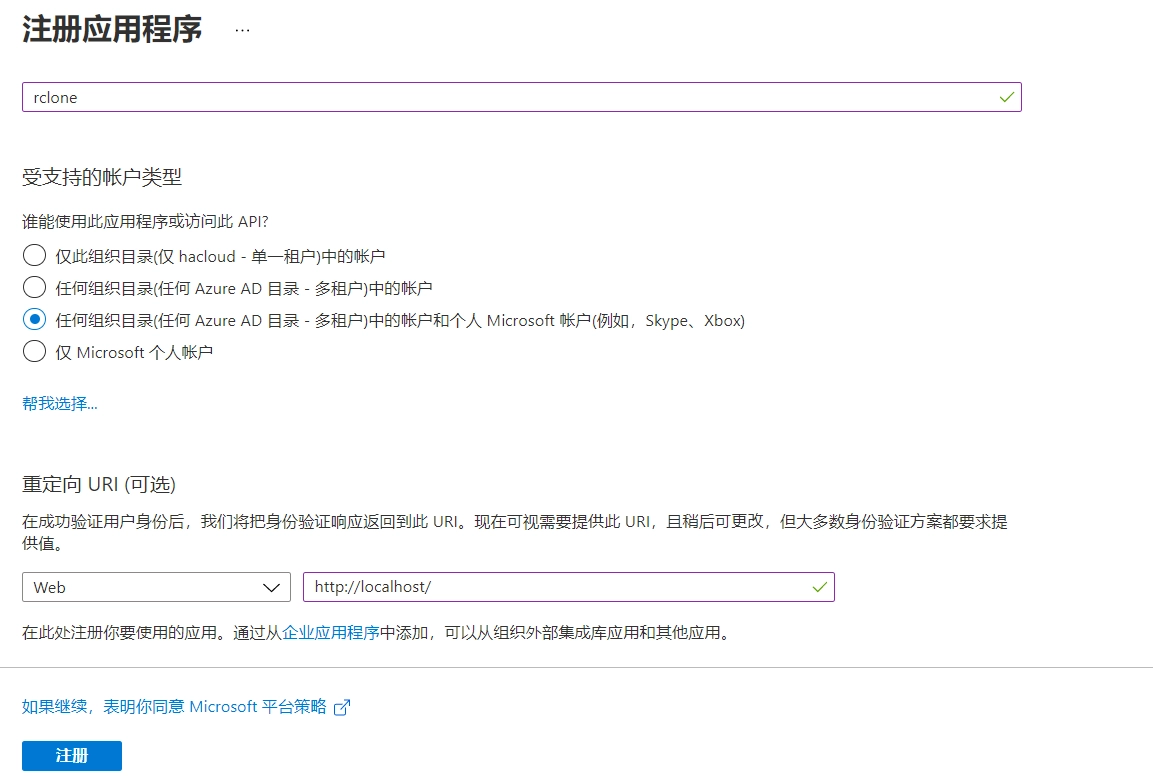
如图所示进行配置,名称可以随便写,账户类型选择第三项,重定向也要设置
记录下应用程序(客户端)ID,后面要用到
1.2 获取 client_secret
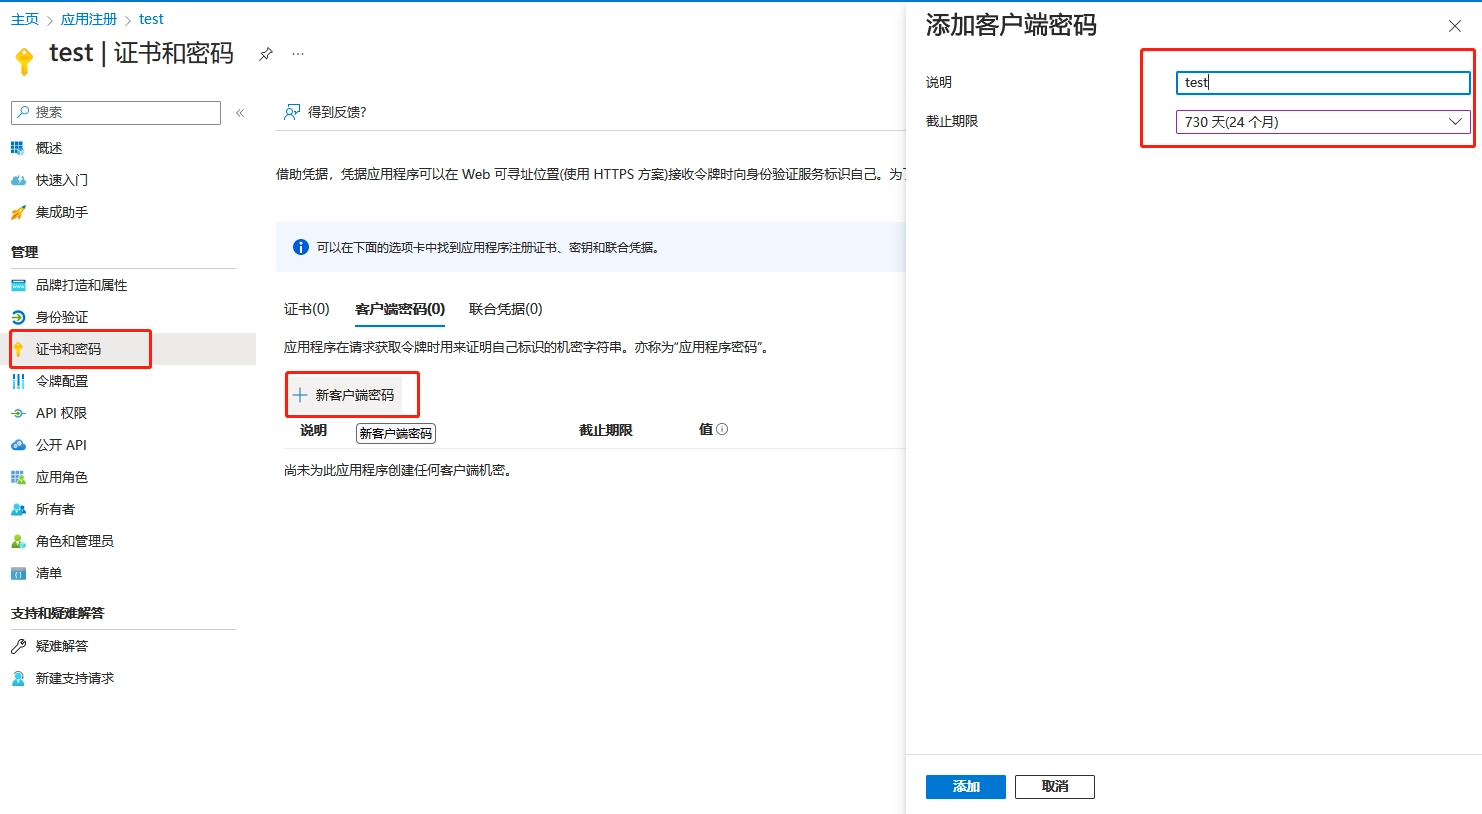
依次点击证书和密码,新客户端密码,在截止期限中将时间选择为最长(即两年)
然后就可以看见值和机密 ID,我们只需要记录下 值 就可以,这个就是 client_secret
这个值一定要保存好,最好单独备份下,以后经常用。我们获取完ID和client_secret后,就需要给这个账号赋权了,不如无法读取到云盘内的内容
1.3 添加 API 权限
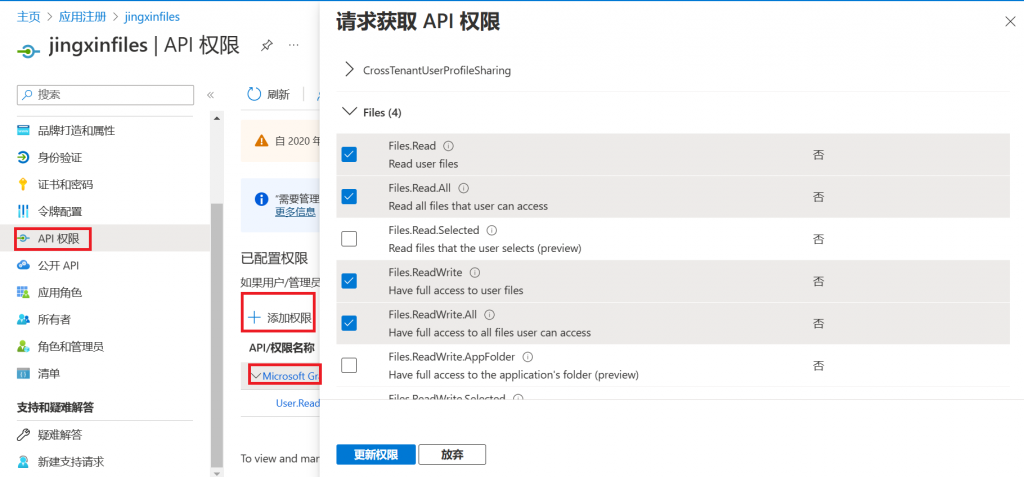
依次点击 API 权限,添加权限,Microsoft Graph,在右边栏搜索并添加权限。
需要 Files.Read, Files.ReadWrite, Files.Read.All, Files.ReadWrite.All, offline_access, User.Read 这几项
添加完成后应该是这样
至此,OneDrive API 创建完成
安装Rclone
首先,使用以下命令下载并安装Rclone:
curl https://rclone.org/install.sh | sudo bash
初始化配置
安装完成后输入:
rclone config
可以看到:
root@green-pods-6:~# df -h //显示磁盘空间信息
Filesystem      Size  Used Avail Use% Mounted on
tmpfs            99M  788K   98M   1% /run
/dev/sda3        20G  9.8G  8.3G  55% /
tmpfs           492M  8.0K  492M   1% /dev/shm
tmpfs           5.0M     0  5.0M   0% /run/lock
/dev/sda2       574M  239M  293M  45% /boot
tmpfs            99M  4.0K   99M   1% /run/user/0
alist:          1.0P     0  1.0P   0% /www/wwwroot/www.xxxx.com/images  //这个是我们上节挂载的
root@green-pods-6:~# rclone config file //显示配置文件的路径,一般配置文件在 ~/.config/rclone/rclone.conf
Configuration file is stored at:
/root/.config/rclone/rclone.conf
root@green-pods-6:~# rclone config //进入交互式配置
Current remotes:

Name                 Type
====                 ====
alist                webdav   //之前的配置

e) Edit existing remote
n) New remote
d) Delete remote
r) Rename remote
c) Copy remote
s) Set configuration password
q) Quit config
e/n/d/r/c/s/q> n     //输入n新建配置

Enter name for new remote.
name> odrive       //随便输入个名字

Option Storage.
Type of storage to configure.
Choose a number from below, or type in your own value.
 1 / 1Fichier
   \ (fichier)
 2 / Akamai NetStorage
   \ (netstorage)
 3 / Alias for an existing remote
   \ (alias)
 4 / Amazon Drive
   \ (amazon cloud drive)
 5 / Amazon S3 Compliant Storage Providers including AWS, Alibaba, ArvanCloud, Ceph, ChinaMobile, Cloudflare, DigitalOcean, Dreamhost, GCS, HuaweiOBS, IBMCOS, IDrive, IONOS, LyveCloud, Leviia, Liara, Linode, Minio, Netease, Petabox, RackCorp, Rclone, Scaleway, SeaweedFS, StackPath, Storj, Synology, TencentCOS, Wasabi, Qiniu and others
   \ (s3)
 6 / Backblaze B2
   \ (b2)
 7 / Better checksums for other remotes
   \ (hasher)
 8 / Box
   \ (box)
 9 / Cache a remote
   \ (cache)
10 / Citrix Sharefile
   \ (sharefile)
11 / Combine several remotes into one
   \ (combine)
12 / Compress a remote
   \ (compress)
13 / Dropbox
   \ (dropbox)
14 / Encrypt/Decrypt a remote
   \ (crypt)
15 / Enterprise File Fabric
   \ (filefabric)
16 / FTP
   \ (ftp)
17 / Google Cloud Storage (this is not Google Drive)
   \ (google cloud storage)
18 / Google Drive
   \ (drive)
19 / Google Photos
   \ (google photos)
20 / HTTP
   \ (http)
21 / Hadoop distributed file system
   \ (hdfs)
22 / HiDrive
   \ (hidrive)
23 / ImageKit.io
   \ (imagekit)
24 / In memory object storage system.
   \ (memory)
25 / Internet Archive
   \ (internetarchive)
26 / Jottacloud
   \ (jottacloud)
27 / Koofr, Digi Storage and other Koofr-compatible storage providers
   \ (koofr)
28 / Linkbox
   \ (linkbox)
29 / Local Disk
   \ (local)
30 / Mail.ru Cloud
   \ (mailru)
31 / Mega
   \ (mega)
32 / Microsoft Azure Blob Storage
   \ (azureblob)
33 / Microsoft Azure Files
   \ (azurefiles)
34 / Microsoft OneDrive
   \ (onedrive)
35 / OpenDrive
   \ (opendrive)
36 / OpenStack Swift (Rackspace Cloud Files, Blomp Cloud Storage, Memset Memstore, OVH)
   \ (swift)
37 / Oracle Cloud Infrastructure Object Storage
   \ (oracleobjectstorage)
38 / Pcloud
   \ (pcloud)
39 / PikPak
   \ (pikpak)
40 / Proton Drive
   \ (protondrive)
41 / Put.io
   \ (putio)
42 / QingCloud Object Storage
   \ (qingstor)
43 / Quatrix by Maytech
   \ (quatrix)
44 / SMB / CIFS
   \ (smb)
45 / SSH/SFTP
   \ (sftp)
46 / Sia Decentralized Cloud
   \ (sia)
47 / Storj Decentralized Cloud Storage
   \ (storj)
48 / Sugarsync
   \ (sugarsync)
49 / Transparently chunk/split large files
   \ (chunker)
50 / Union merges the contents of several upstream fs
   \ (union)
51 / Uptobox
   \ (uptobox)
52 / WebDAV
   \ (webdav)
53 / Yandex Disk
   \ (yandex)
54 / Zoho
   \ (zoho)
55 / premiumize.me
   \ (premiumizeme)
56 / seafile
   \ (seafile)
Storage> 34      //输入我们要新建的云盘类型,这里我们用的是微软的OneDrive,所以选择34

Option client_id.
OAuth Client Id.
Leave blank normally.
Enter a value. Press Enter to leave empty.
client_id> 36399323-f3da-4e26-aa1c-dfcf381b212b      //输入我们应用程序(客户端) ID

Option client_secret.
OAuth Client Secret.
Leave blank normally.
Enter a value. Press Enter to leave empty.
client_secret> ~Dy8Q~ajcCyU8KQ34Nfg1zkTK3U5tGQhWEMcjaTh     //证书密码里面的值

Option region.
Choose national cloud region for OneDrive.
Choose a number from below, or type in your own string value.
Press Enter for the default (global).
 1 / Microsoft Cloud Global   //微软全球
   \ (global)
 2 / Microsoft Cloud for US Government   //微软美国
   \ (us)
 3 / Microsoft Cloud Germany    //微软德国
   \ (de)
 4 / Azure and Office 365 operated by Vnet Group in China    //微软中国
   \ (cn)
region> 1  //我们默认使用全球就行,千万不要选中国

Edit advanced config?      //是否进行高级配置
y) Yes
n) No (default)
y/n> n    //输入 'n' 不进行高级配置

//选择授权认证方式,由于是vps无图形界面选n,用命令行工具
Use web browser to automatically authenticate rclone with remote?
 * Say Y if the machine running rclone has a web browser you can use
 * Say N if running rclone on a (remote) machine without web browser access
If not sure try Y. If Y failed, try N.

y) Yes (default)
n) No
y/n> n  //输入n,进行手动授权

Option config_token.
For this to work, you will need rclone available on a machine that has
a web browser available.
For more help and alternate methods see: https://rclone.org/remote_setup/
Execute the following on the machine with the web browser (same rclone
version recommended):
        rclone authorize "onedrive" "eyJjbGllbnRfaWQiOiIzNjM5OTMyMy1mM2RhLTRlMjYtYWExYy1kZmNmMzgxYjIxMmIiLCJjbGllbnRfc2VjcmV0IjoifkR5OFF+YWpjQ3lVOEtRMzROZmcxemtUSzNVNXRHUWhXRU1jamFUaCJ9"
Then paste the result.
Enter a value.
config_token> {"access_token":"eyxxxxxxxx一大串,{}里面的全部复制过来"}
这里说下我们需要怎么去获取access_token的值,授权码需要在本地电脑上获取,访问 https://rclone.org/downloads/ 根据你的电脑系统版本下载对应的 Rclone。
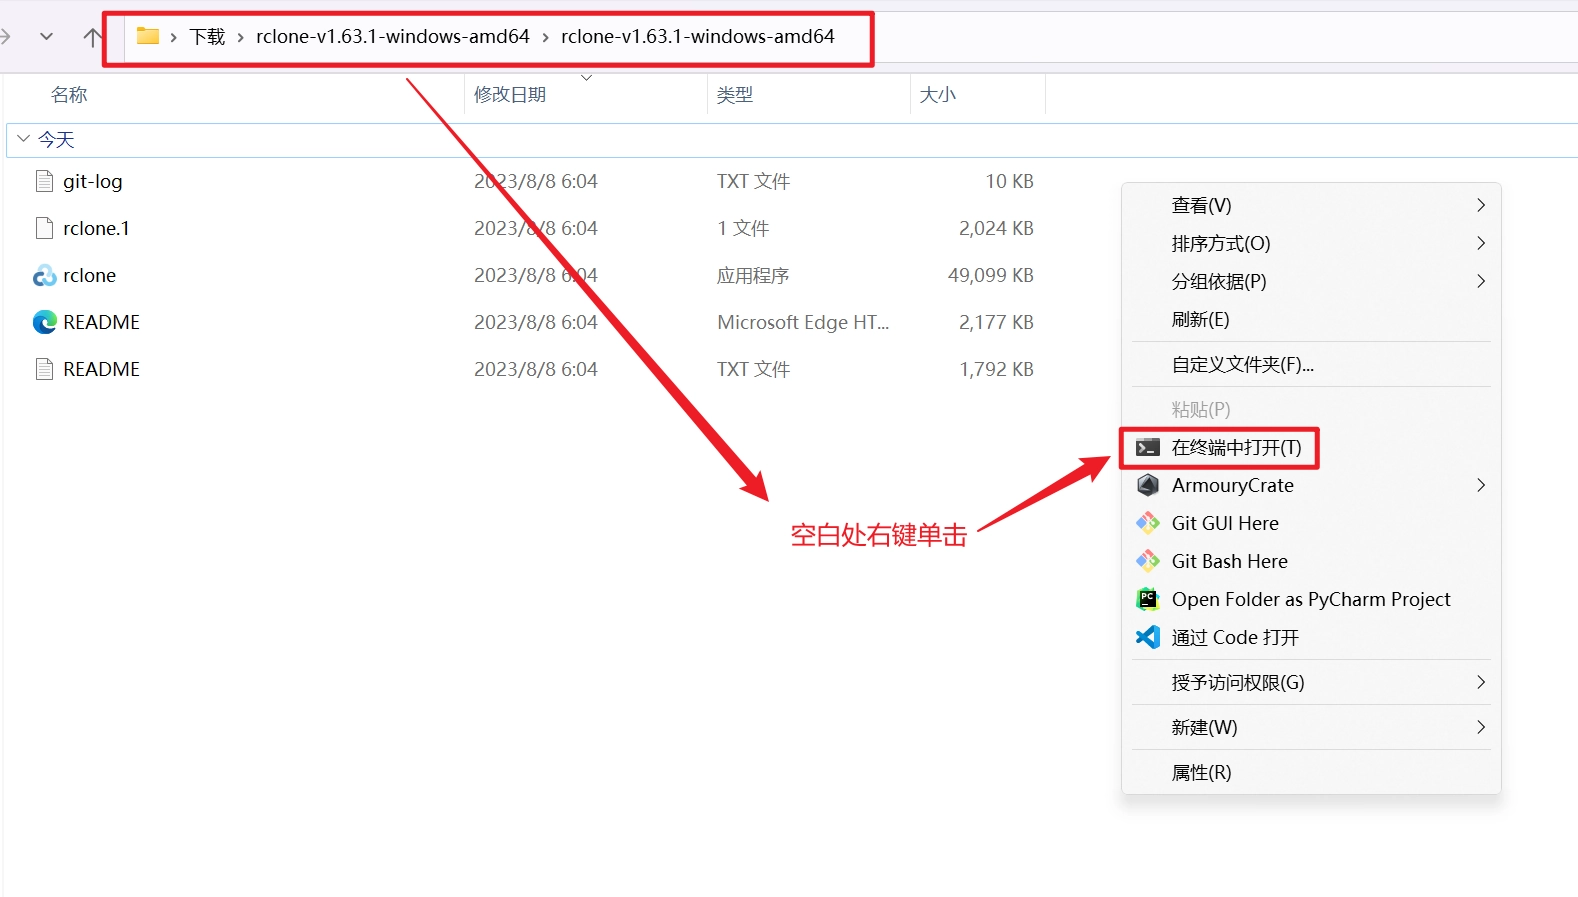
下载完成后解压,进入存放 Rclone 的目录,以 Win11 为例,打开存放Rclone 的目录,右击在终端中打开或者在文件地址栏输入cmd进入终端,
在存放 Rclone 的目录可以看到 rclone.exe 的可执行程序,输入:
./rclone authorize "onedrive"
./ 表示在当前目录下查找 rclone 可执行文件并运行它。
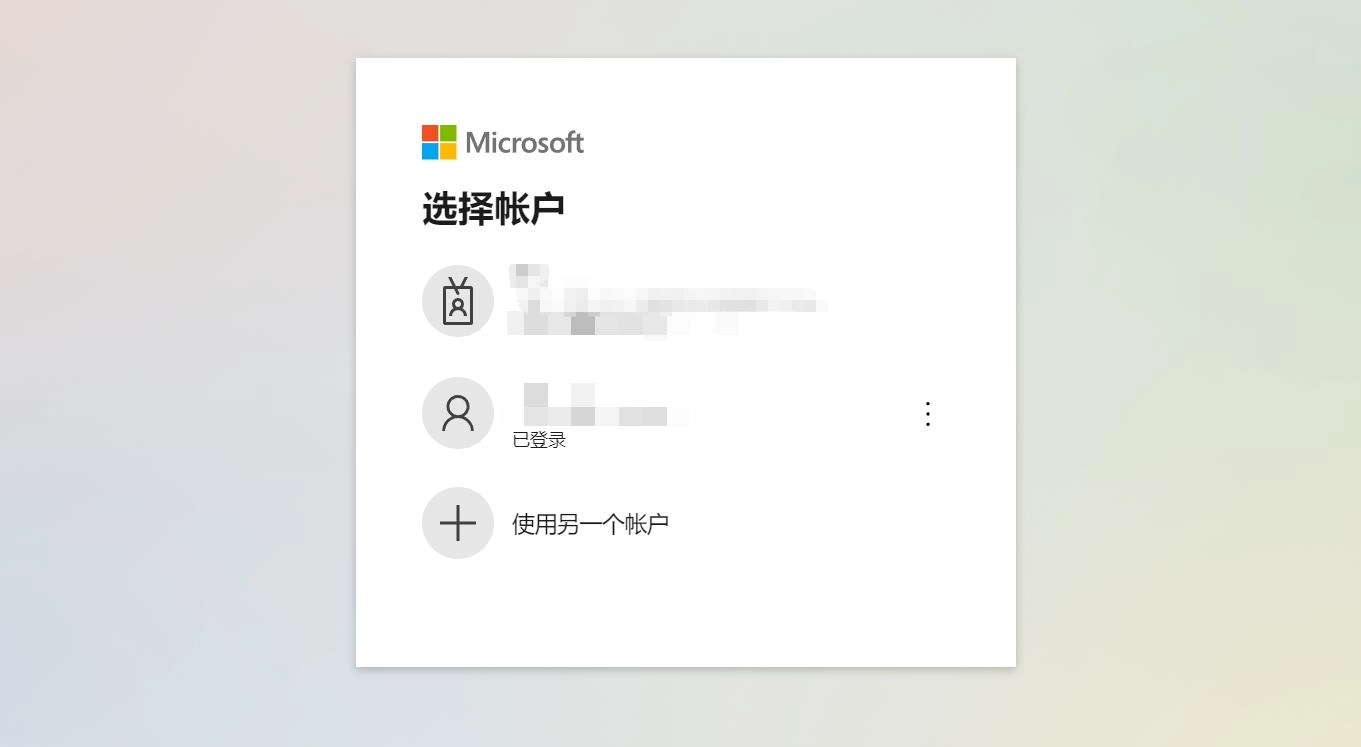
浏览器应该会自动打开,如果浏览器没有打开可以根据提示复制地址访问。如果浏览器登录了 OneDrive 的话会直接显示授权确认信息,如果没有登录的话会弹出登录页面,登录 OneDrive 后也会显示授权确认信息,如下:
登陆后显示Success!All done. Please go back to rclone.返回黑框界面,选择 接受 后在本地命令行会显示一串 JSON 格式的授权信息,复制授权信息包括首尾的 {} ,复制箭头内的值粘贴到vps ssh终端
machine --->
adfhd...
<---End paste
Option config_type.
Type of connection
Choose a number from below, or type in an existing string value.
Press Enter for the default (onedrive).
 1 / OneDrive Personal or Business
   \ (onedrive)
 2 / Root Sharepoint site
   \ (sharepoint)
   / Sharepoint site name or URL
 3 | E.g. mysite or https://contoso.sharepoint.com/sites/mysite
   \ (url)
 4 / Search for a Sharepoint site
   \ (search)
 5 / Type in driveID (advanced)
   \ (driveid)
 6 / Type in SiteID (advanced)
   \ (siteid)
   / Sharepoint server-relative path (advanced)
 7 | E.g. /teams/hr
   \ (path)
config_type> 1    //选择云盘类型,我们这里选个人或商业
//显示找到的 OneDrive 账户
Option config_driveid.
Select drive you want to use
Choose a number from below, or type in your own string value.
Press Enter for the default (b!Djo0focSiUGAyrum5oDN9DduCCaupjJBvY7Nk_xoBioCxes1TmczRIaDdQZONyul).
 1 / OneDrive (business)
   \ (b!Djo0focSiUGAyrum5oDN9DduCCaupjJBvY7Nk_xoBioCxes1TmczRIaDdQZONyul)
config_driveid> 1  //这里输入1,选择我们的账号,如果有多个,注意别选错
//再次确认云盘账户
Drive OK?

Found drive "root" of type "business"
URL: https://xzmv-my.sharepoint.com/personal/mvxz_xzmv_onmicrosoft_com/Documents

y) Yes (default)
n) No
y/n> y   //输入y确认即可
//下面会列出我们刚才的详细配置,让你确认,
Configuration complete.
Options:
- type: onedrive
- client_id: 36399323-f3da-4e26-aa1c-dfcf381b212b
- client_secret: ~Dy8Q~ajcCyU8KQ34Nfg1zkTK3U5tGQhWEMcjaTh
- token: {"access_token":"ey一大串","expiry":"2023-12-14T17:33:21.289067+08:00"}
- drive_id: b!Djo0focSiUGAyrum5oDN9DduCCaupjJBvY7Nk_xoBioCxes1TmczRIaDdQZONyul
- drive_type: business
Keep this "odrive" remote?
y) Yes this is OK (default)
e) Edit this remote
d) Delete this remote
y/e/d> y    //确认信息无误,输入y确认
//显示现有的配置
Current remotes:

Name                 Type
====                 ====
alist                webdav
odrive               onedrive

e) Edit existing remote
n) New remote
d) Delete remote
r) Rename remote
c) Copy remote
s) Set configuration password
q) Quit config
e/n/d/r/c/s/q> q  //输入q退出配置
配置完成剩下的就需要挂载到我们需要的目录了
例如我要把一个名为 ODrive 的配置挂载到本地的 /OneDrive 目录,可以这样写:
rclone mount ODrive:/ /OneDrive --copy-links --no-gzip-encoding --no-check-certificate --allow-other --allow-non-empty --umask 000 --daemon
这里挂载的是整个 OneDrive 网盘,所以我写的是 OneDrive 的根目录 / 。
以下是命令中使用的选项的解释:
--copy-links: 如果 OneDrive 中存在链接(symlink),则复制链接而不是解析它们。
--no-gzip-encoding: 禁止对文件进行 gzip 编码。
--no-check-certificate: 禁止检查 SSL 证书。
--allow-other: 允许其他用户(非挂载命令的用户)访问和操作挂载的文件系统。
--allow-non-empty: 允许挂载到非空目录。如果您要将 OneDrive 挂载到一个非空目录,需要使用这个选项。
--umask 000: 设置挂载目录的文件权限掩码为 000,意味着挂载的文件和目录对所有用户都具有完全的权限。
--daemon:后台运行程序
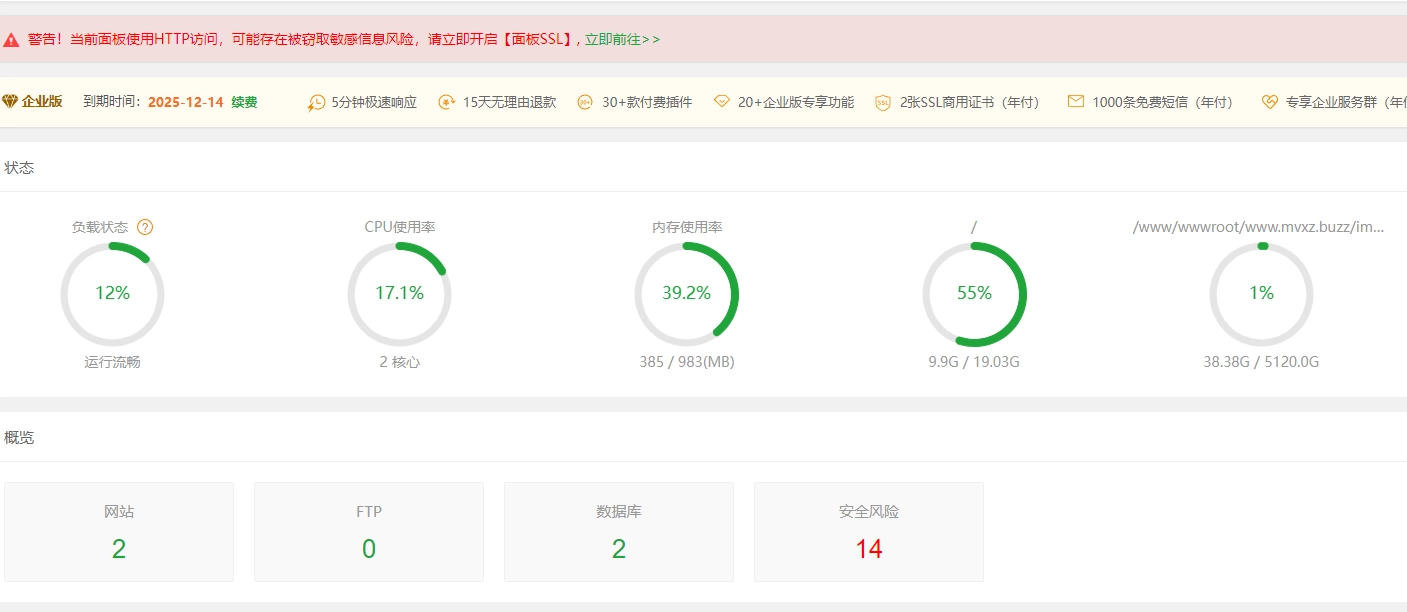
最后我们再用df -h命令看下磁盘信息,不出意外就可以显示刚刚我们挂载的云盘了,或者打开我们的宝塔面板首页看下,已经识别处理可以使用了。
